

How To Do Nail Art At Home?
 February 16, 2018
Nail art. It can be a total bummer sometimes.
We often see complicated tutorials of intricate designs and are often put off by it. Something a little simpler would definitely draw more people in. Maintaining your nails is honestly the best accessory since you just need to do them only about, once a week.
Top 10 Tutorials To Learn Nail Art At Home
- Tri Color Cliffs Nail Art
- Bow Nail Art Tutorial
- Splatter Nail Art Tutorial
- Chevron Nail Art Tutorial
- Glitter V-Tip Nail Art Tutorial
- Galaxy Nails
- Stripes and Lines Nail Art Tutorial
- Pastel Daisies Nail Art Tutorial
- Nautical Nails
- Monochrome Polka Dots Nail Art Tutorial
These tutorials are quite simple and can be done with the things you’d find right at home. So, read on to get pretty nails!
1. Tri Color Cliffs Nail Art

This nail art is super simple and is the perfect choice for someone who is just starting out. You don’t need any extra tools apart from your nail polishes for this one. This tutorial will be described using certain colors, but it’s entirely up to you! Play around with your choice of colors!
What You Will Need
- Pastel blue nail polish
- White nail polish
- Pastel coral nail polish
How To Apply?
- On clean nails, apply a base coat to protect your nails.
- Use the pastel blue color to create a vertical stripe on one corner, while leaving some space empty near the cuticle.
- Now paint from the center, a little lower.
- Create the last stripe, again lower. You should have what looks 3 steps.
- Repeat the steps but starting from below the blue.
- Do the same with the pastel coral.
- Seal this with a top coat and you are done!
Back To TOC
2. Bow Nail Art Tutorial

Now that you’ve gotten the hang of doing nail art with just the nail polish, it’s time to start adding tools to the pretty picture! This is also an incredibly simple nail art that you can easily do! It’s very casual so it can be worn at all times.
What You Will Need
- Sky blue nail polish
- White nail polish
- Black nail polish
- Nail striper or a very fine paint brush
How To Apply?
- Start by painting all of your nails with the sky blue shade as your base color.
- Paint over it with white in a heart shape as shown in the image.
- Using a nail striper or a paintbrush dipped in black nail polish, follow the shape where the white and blue meet and create two loops at the center so that it looks like a bow.
- Seal it with a top coat, and you are good to go!
Back To TOC
3. Splatter Nail Art Tutorial

This one is for the artist in you. You can create a fun paint splatter pattern using just a paintbrush!
What You Will Need
- White nail polish
- Light blue nail polish
- Purple nail polish
- Pink nail polish
- A stiff paint brush
How To Apply?
- Paint all your nails with white as the base color.
- Now comes the fun part. Find a stiff brush like the one shown in the image. Dip it in the light blue polish, and run your fingers through the brush and direct it at your nail so that the brush splatters on your nails.
- Repeat the same thing for the pink and the purple.
- You should have a nice splatter nail art.
- Use a cotton swab dipped in nail polish remover to clean up the sides around the nails.
- Seal it with a top coat.
Back To TOC
[ Designs: 2 Glorious Purple Nail Art Tutorials with Pictures ]
4. Chevron Nail Art Tutorial
Okay, I know what you’re thinking. This may seem complicated, but the best part is, it’s actually easy. For the tutorial, red, white and blue were used but the choice of colors is all up to you!
What You Will Need
- Red nail polish
- White nail polish
- Blue nail polish
- Tape
How To Apply?
- Use red nail polish as the base for the chevron nail art.
- Strategically place the tape so that it creates a chevron stencil.
- Paint over it with the blue polish.
- Wait for a minute or so to remove the tape.
- Now place the tape as shown near the cuticle and paint the area with white.
- Again, wait for a minute before pulling off the tape, and seal it all with a top coat.
Back To TOC
5. Glitter V-Tip Nail Art Tutorial

Is there a party around the corner? You probably had plans of going to the salon to get your nails done, but something else popped up, and now, you’re short on time with your nails undone. This nail art is perfect as they’re easy enough to do when you’re in a rush.
What You Will Need
- Black nail polish
- Silver glitter nail polish
- A ‘V’ shaped sticker or a piece of tape.
How To Apply?
- Paint all your nails black as the background color.
- Place the V sticker or the corner of a piece of tape near the tips as shown.
- Paint the bottom half with the glitter polish.
- Wait for a minute before you carefully pull away the tape or sticker.
- Finish it off with a top coat.
For more glitter nail art tutorials, click here.
Back To TOC
6. Galaxy Nails

These nails are out of this world! I love anything to do with space. In fact, one of my favorite genres of books and films is sci-fi so it’s no wonder that this nail art made it o this list.
What You Will Need
- Black nail polish
- Metallic green nail polish
- Pink nail polish
- Blue nail polish
- Makeup sponge
- Glitter top coat
How To Apply?
- Start with a black base.
- Apply some metallic green on a makeup sponge and dab it onto your nail.
- Now apply the pink on a makeup sponge and dab onto the nail.
- Continue the same process a blue shade.
- By this point, your nails will already start to resemble the galaxy.
- To amp up the game, add a glitter top coat, and you’re good to go!
Back To TOC
7. Stripes and Lines Nail Art Tutorial

These fun geometric patterns add a little something to your nails and are super easy to do. You need a little patience for this one, but the outcome is worth it!
What You Will Need
- Pastel blue nail polish
- Brown nail polish
- Tape
How To Apply?
- Start with the pastel blue as your base.
- Once it is fully dry, you can begin the placement of your tape.
- On the pinky, place it diagonally.
- Cut up thin stripes for the ring finger.
- Create a ‘V’ shape from the tape for the middle finger.
- Create very sharp angled triangles with the tape and place them on the index finger as shown.
- Similarly, create a design for the thumb finger.
- Now, paint over the tape stencils you just created with brown nail polish.
- Wait for a minute or so for the nail polish to dry a little and then carefully remove the tape.
- Voila! You have yourself a fun manicure!
Back To TOC
8. Pastel Daisies Nail Art Tutorial

Ready to step up your nail art game? This honestly looks so pretty, I’m tempted to try this one out on my nails! I’m weak for anything pastel so this one is straight up my alley as far as nail arts are concerned.
What You Will Need
- Base Coat
- Pastel pink nail polish
- White nail polish
- Gold studs, bindis, or gold polish.
- Gold glitter nail polish
- Dotting tool or a bobby pin
How To Apply?
- Apply a base coat.
- Apply the pastel pink polish to all your nails except the ring finger.
- Place a gold stud near the cuticle of the index and pinky fingernails. Do this while your polish is still wet. This helps it to stick on. In case you do not have any studs or bindis, you can use gold polish.
- Now moving onto the middle and thumb. These two nails will be clad in daisies. Use a dotting tool to create 5 dots in a circle so that it looks like a daisy. If you don’t have a dotting tool, you can use the end of a dotting tool.
- Place the gold stud or gold nail polish at the center of the daisies.
- Now all that’s left is the ring finger. Apply the gold nail polish as the base, and the glitter polish over that. This gives it a more intense look.
- Seal everything with a top coat, and there you go!
Back To TOC
9. Nautical Nails

A fan of sailing and the vast open waters? Then this nautical nail is probably perfect for you. And if for some reason you don’t like the ocean, that’s okay because this still makes for a really cute nail design.
What You Will Need
- White nail polish
- Navy blue nail polish
- Red nail polish
- Nail striper or a fine paint brush.
- Toothpick
How To Apply?
- Start with a white base.
- Use a nail striper dipped in navy blue nail polish to create stripes.
- Now, using the blunt side of a toothpick, create an anchor design. First, create a tiny circle.
- Then, create a line down from the circle.
- Draw two lines from the vertical line so it looks like an anchor.
- Finally, draw a horizontal line in the middle to complete it.
- Seal it with a top coat and you are ready to sail away!
Back To TOC
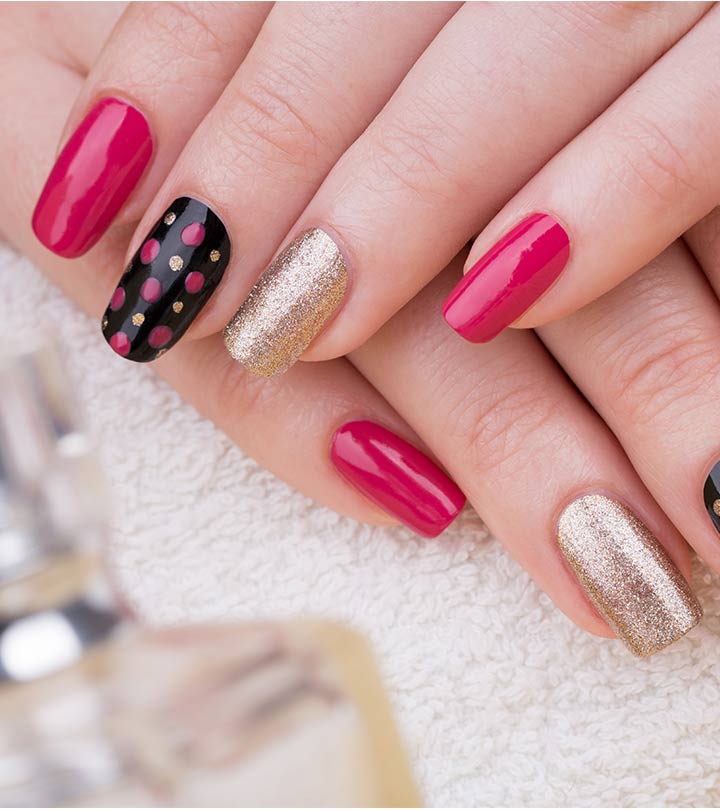
10. Monochrome Polka Dots Nail Art Tutorial

Let’s finish off this list with an easy one, shall we? I love this one! Anything monochrome is my cup of tea. This black and white polka dots nail art is another cute one which can be achieved with minimal effort.
What You Will Need
- Black nail polish
- White nail polish
- Dotting tool, bobby pin or pencil.
How To Apply?
- Paint all of your nails black.
- Using a dotting tool, the back of a bobby pin or a pencil dipped into white nail polish, create dots.
- It’s as easy as that! Finish with a top coat.
Back To TOC
[ Read: 8 Amazing Black And White Nail Designs ]
Let’s check out some tips that would make your nail art process a little easier.
Important Tips And Hacks To Do Nail Art At Home
- Most of the times, people have an issue with keeping their hands steady. Make sure to work on a flat surface and sit down while doing it. This will give you more control.
- Line the skin around your nails with petroleum jelly to ensure a quick clean up.
- You can also apply a layer of glue around the nails so that it can be peeled off after you finish your nail art.
- Use a paintbrush dipped in nail polish remover to clean the area around your nails.
- Make sure your nails are free from any oils or lotions before you start with the nail art!
Tempted to try them out? Well, I definitely know I am. My nails have been bare for a while maybe it’s time to dive back into nail art again. Nail art can be quite therapeutic. It gives you some time to be alone and gather your thoughts, and by the end of it, you have beautiful nails! Who can say no to that?
Recommended Articles
- 60 Simple and Beautiful Nail Designs for Short Nails
- 30 Pretty Pink Nail Designs For Modern Women
- 12 Best Nail Art Ideas for Toes
- 50 Animal Themed Nail Art Designs To Inspire You
- How To Do 3D Nail Art Perfectly?
February 16, 2018
Nail art. It can be a total bummer sometimes.
We often see complicated tutorials of intricate designs and are often put off by it. Something a little simpler would definitely draw more people in. Maintaining your nails is honestly the best accessory since you just need to do them only about, once a week.
Top 10 Tutorials To Learn Nail Art At Home
- Tri Color Cliffs Nail Art
- Bow Nail Art Tutorial
- Splatter Nail Art Tutorial
- Chevron Nail Art Tutorial
- Glitter V-Tip Nail Art Tutorial
- Galaxy Nails
- Stripes and Lines Nail Art Tutorial
- Pastel Daisies Nail Art Tutorial
- Nautical Nails
- Monochrome Polka Dots Nail Art Tutorial
These tutorials are quite simple and can be done with the things you’d find right at home. So, read on to get pretty nails!
1. Tri Color Cliffs Nail Art
This nail art is super simple and is the perfect choice for someone who is just starting out. You don’t need any extra tools apart from your nail polishes for this one. This tutorial will be described using certain colors, but it’s entirely up to you! Play around with your choice of colors!
What You Will Need
- Pastel blue nail polish
- White nail polish
- Pastel coral nail polish
How To Apply?
- On clean nails, apply a base coat to protect your nails.
- Use the pastel blue color to create a vertical stripe on one corner, while leaving some space empty near the cuticle.
- Now paint from the center, a little lower.
- Create the last stripe, again lower. You should have what looks 3 steps.
- Repeat the steps but starting from below the blue.
- Do the same with the pastel coral.
- Seal this with a top coat and you are done!
Back To TOC
2. Bow Nail Art Tutorial
Now that you’ve gotten the hang of doing nail art with just the nail polish, it’s time to start adding tools to the pretty picture! This is also an incredibly simple nail art that you can easily do! It’s very casual so it can be worn at all times.
What You Will Need
- Sky blue nail polish
- White nail polish
- Black nail polish
- Nail striper or a very fine paint brush
How To Apply?
- Start by painting all of your nails with the sky blue shade as your base color.
- Paint over it with white in a heart shape as shown in the image.
- Using a nail striper or a paintbrush dipped in black nail polish, follow the shape where the white and blue meet and create two loops at the center so that it looks like a bow.
- Seal it with a top coat, and you are good to go!
Back To TOC
3. Splatter Nail Art Tutorial
This one is for the artist in you. You can create a fun paint splatter pattern using just a paintbrush!
What You Will Need
- White nail polish
- Light blue nail polish
- Purple nail polish
- Pink nail polish
- A stiff paint brush
How To Apply?
- Paint all your nails with white as the base color.
- Now comes the fun part. Find a stiff brush like the one shown in the image. Dip it in the light blue polish, and run your fingers through the brush and direct it at your nail so that the brush splatters on your nails.
- Repeat the same thing for the pink and the purple.
- You should have a nice splatter nail art.
- Use a cotton swab dipped in nail polish remover to clean up the sides around the nails.
- Seal it with a top coat.
Back To TOC
[ Designs: 2 Glorious Purple Nail Art Tutorials with Pictures ]
4. Chevron Nail Art Tutorial
Okay, I know what you’re thinking. This may seem complicated, but the best part is, it’s actually easy. For the tutorial, red, white and blue were used but the choice of colors is all up to you!
What You Will Need
- Red nail polish
- White nail polish
- Blue nail polish
- Tape
How To Apply?
- Use red nail polish as the base for the chevron nail art.
- Strategically place the tape so that it creates a chevron stencil.
- Paint over it with the blue polish.
- Wait for a minute or so to remove the tape.
- Now place the tape as shown near the cuticle and paint the area with white.
- Again, wait for a minute before pulling off the tape, and seal it all with a top coat.
Back To TOC
5. Glitter V-Tip Nail Art Tutorial
Is there a party around the corner? You probably had plans of going to the salon to get your nails done, but something else popped up, and now, you’re short on time with your nails undone. This nail art is perfect as they’re easy enough to do when you’re in a rush.
What You Will Need
- Black nail polish
- Silver glitter nail polish
- A ‘V’ shaped sticker or a piece of tape.
How To Apply?
- Paint all your nails black as the background color.
- Place the V sticker or the corner of a piece of tape near the tips as shown.
- Paint the bottom half with the glitter polish.
- Wait for a minute before you carefully pull away the tape or sticker.
- Finish it off with a top coat.
For more glitter nail art tutorials, click here.
Back To TOC
6. Galaxy Nails
These nails are out of this world! I love anything to do with space. In fact, one of my favorite genres of books and films is sci-fi so it’s no wonder that this nail art made it o this list.
What You Will Need
- Black nail polish
- Metallic green nail polish
- Pink nail polish
- Blue nail polish
- Makeup sponge
- Glitter top coat
How To Apply?
- Start with a black base.
- Apply some metallic green on a makeup sponge and dab it onto your nail.
- Now apply the pink on a makeup sponge and dab onto the nail.
- Continue the same process a blue shade.
- By this point, your nails will already start to resemble the galaxy.
- To amp up the game, add a glitter top coat, and you’re good to go!
Back To TOC
7. Stripes and Lines Nail Art Tutorial
These fun geometric patterns add a little something to your nails and are super easy to do. You need a little patience for this one, but the outcome is worth it!
What You Will Need
- Pastel blue nail polish
- Brown nail polish
- Tape
How To Apply?
- Start with the pastel blue as your base.
- Once it is fully dry, you can begin the placement of your tape.
- On the pinky, place it diagonally.
- Cut up thin stripes for the ring finger.
- Create a ‘V’ shape from the tape for the middle finger.
- Create very sharp angled triangles with the tape and place them on the index finger as shown.
- Similarly, create a design for the thumb finger.
- Now, paint over the tape stencils you just created with brown nail polish.
- Wait for a minute or so for the nail polish to dry a little and then carefully remove the tape.
- Voila! You have yourself a fun manicure!
Back To TOC
8. Pastel Daisies Nail Art Tutorial
Ready to step up your nail art game? This honestly looks so pretty, I’m tempted to try this one out on my nails! I’m weak for anything pastel so this one is straight up my alley as far as nail arts are concerned.
What You Will Need
- Base Coat
- Pastel pink nail polish
- White nail polish
- Gold studs, bindis, or gold polish.
- Gold glitter nail polish
- Dotting tool or a bobby pin
How To Apply?
- Apply a base coat.
- Apply the pastel pink polish to all your nails except the ring finger.
- Place a gold stud near the cuticle of the index and pinky fingernails. Do this while your polish is still wet. This helps it to stick on. In case you do not have any studs or bindis, you can use gold polish.
- Now moving onto the middle and thumb. These two nails will be clad in daisies. Use a dotting tool to create 5 dots in a circle so that it looks like a daisy. If you don’t have a dotting tool, you can use the end of a dotting tool.
- Place the gold stud or gold nail polish at the center of the daisies.
- Now all that’s left is the ring finger. Apply the gold nail polish as the base, and the glitter polish over that. This gives it a more intense look.
- Seal everything with a top coat, and there you go!
Back To TOC
9. Nautical Nails
A fan of sailing and the vast open waters? Then this nautical nail is probably perfect for you. And if for some reason you don’t like the ocean, that’s okay because this still makes for a really cute nail design.
What You Will Need
- White nail polish
- Navy blue nail polish
- Red nail polish
- Nail striper or a fine paint brush.
- Toothpick
How To Apply?
- Start with a white base.
- Use a nail striper dipped in navy blue nail polish to create stripes.
- Now, using the blunt side of a toothpick, create an anchor design. First, create a tiny circle.
- Then, create a line down from the circle.
- Draw two lines from the vertical line so it looks like an anchor.
- Finally, draw a horizontal line in the middle to complete it.
- Seal it with a top coat and you are ready to sail away!
Back To TOC
10. Monochrome Polka Dots Nail Art Tutorial
Let’s finish off this list with an easy one, shall we? I love this one! Anything monochrome is my cup of tea. This black and white polka dots nail art is another cute one which can be achieved with minimal effort.
What You Will Need
- Black nail polish
- White nail polish
- Dotting tool, bobby pin or pencil.
How To Apply?
- Paint all of your nails black.
- Using a dotting tool, the back of a bobby pin or a pencil dipped into white nail polish, create dots.
- It’s as easy as that! Finish with a top coat.
Back To TOC
[ Read: 8 Amazing Black And White Nail Designs ]
Let’s check out some tips that would make your nail art process a little easier.
Important Tips And Hacks To Do Nail Art At Home
- Most of the times, people have an issue with keeping their hands steady. Make sure to work on a flat surface and sit down while doing it. This will give you more control.
- Line the skin around your nails with petroleum jelly to ensure a quick clean up.
- You can also apply a layer of glue around the nails so that it can be peeled off after you finish your nail art.
- Use a paintbrush dipped in nail polish remover to clean the area around your nails.
- Make sure your nails are free from any oils or lotions before you start with the nail art!
Tempted to try them out? Well, I definitely know I am. My nails have been bare for a while maybe it’s time to dive back into nail art again. Nail art can be quite therapeutic. It gives you some time to be alone and gather your thoughts, and by the end of it, you have beautiful nails! Who can say no to that?
Recommended Articles
- 60 Simple and Beautiful Nail Designs for Short Nails
- 30 Pretty Pink Nail Designs For Modern Women
- 12 Best Nail Art Ideas for Toes
- 50 Animal Themed Nail Art Designs To Inspire You
- How To Do 3D Nail Art Perfectly?


