

Hey guys! Welcome to Part 2 of my series of my journey of going blonde. If you are interested, please read Part 1 here, which is all about preparation and getting yourself ready for the big change!
I will repeat my disclaimer, which is that these are my own personal experiences. Everyone’s hair is VERY different. I suggest contacting a professional hair colourist before attempting any drastic change to your hair. I am by no means a professional and won’t take responsibility for any damages. With those yucky formalities out of the way, let’s get to the fun stuff!
When I decided to go blonde, I already had bleached ends that I had done at the hair salon. By having ombered ends, I was able to get to a nice shade quicker. I also didn’t have a build up of hair dye in my hair, which means the roots and most of the brown hair I had was pretty close to my natural colour. If you have medium brown to darker hair, it will take longer to strip your hair of the pigment. It may also damage your hair more than if you were starting with virgin hair. It may be worthwhile to look into finding a colour stripper from your pharmacy or supermarket. This should remove the hair dye from your hair, without bleaching it. If you are ever unsure, consult a hair colourist. They are there to help you!

1. Choosing your bleach product.
To be able to dye your hair blonde, you first need to strip the hair of it’s pigment. Buying a box dye of plain blonde dye will do nothing to your hair, except maybe make it a little orange if it has some bleach in there. The bleaching kit I used was Schwarzkopf Nordic Blonde L1++. This is the strongest bleach that I could find at my local pharmacy or supermarket. I researched it thoroughly online and read a lot of different reviews, some saying it was amazing, and others saying it was crap. My experience was wonderful and this would be a product that I would recommend to others. It’s instructions were concise and clear, the bleach was easy enough to use, and the results were awesome.

2. Protect yourself
Make sure you do ALL of the following:
- Read all the instructions on the bleaching. Three times. I am not kidding. Bleach is a very harsh chemical and can really do damage to your hair, scalp, skin and eyes if you don’t use it correctly. Not to mention the damage it can do to your clothing and bathroom! Do yourself a favour and be wary of chemicals. Walter White would agree with me here.
- Protect your clothes, skin and surfaces. This means making sure that you don’t allow any bleach to get on your vanity, and tying a towel around your neck cape style. You should also dab Vaseline or another Petroleum Jelly around your hair line to make sure you don’t end up with a burnt forehead!
- Phone a friend. Bleaching is tricky business. Time is of the essence when bleaching your hair, because you want to make sure that the majority of the hair develops all at the same time. The two times I have bleached my hair, I asked my sister and then my bestie to help me out.
- Time that shit. Make sure you have your stop watch or iPhone nearby to ensure that you don’t leave the bleach on your hair past the maximum time. Your hair can fall out or snap off! Not cool! It’s a great time to catch up on Candy Crush while you are waiting though.
- Again, be smart. Use your common sense, read instructions and research, research, research. I cannot stress this enough! I watched at least a dozen videos on bleaching hair before I took the plunge, and I am so glad I did. YouTube and Google are great research tools. Use them!
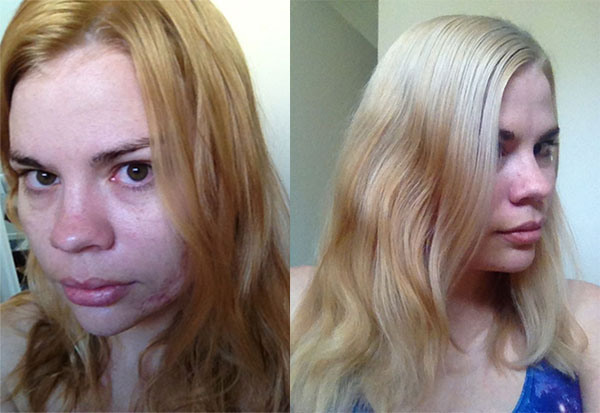
L -> R After first bleach, and after second bleach and toning
3. Don’t freak out if it’s not quite the right colour!
If you watch a lot of YouTube bleaching videos (you should be! See step 2!) you will see the canary colour that your hair will turn. It will be a bright canary yellow. Don’t freak out when you hair goes orange, that means it is working, and it’s almost ready!
When it gets to that chicken yellow colour, it will be time to wash out the bleach and start toning. I bleached my hair in two steps and I did a deep conditioning treatment in between. This gave my hair a break and I was able to strengthen it a little with a keratin treatment. We will go into treatments and toning in a future post!
I hope you got something out of Part 2 of this series! Is anyone thinking about bleaching their hair?
Stay Minty!
Kate Xx